Showing posts with label How-To. Show all posts

Friday, December 21, 2012

Organizing your Home

Getting your home organized can seem like a never ending task, especially at this time of the year when you frequently have guests coming and going. We've found some neat ideas for you to use to help organize.


1. Store small kitchen utensils in a white stoneware pitcher. It not only keeps everything organized, but when left out on the counter it doubles as decor.

2. Use small jelly jars in the craft area to hold small things like buttons, popsicle sticks, and more!

3. Baskets always help a pantry stay organized.

4. Use shelves under your upper cabinets to keep measuring cups, measuring spoons and other often used items within reach.

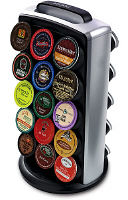
5.Have a Keurig? Here's a great way to organize those k-cups:
It's a k-cup tower.

What are your favorite organizing ideas?


Friday, October 19, 2012

Common Food Storage Mistakes

There are some food storage mistakes that most people don't realize that they have, we will go over these mistakes today and while it may be to late to remedy some of these mistakes this year, it will help you plan for next year.  These tips will help you whether you store food just for each winter or if you are storing food for possible long term disasters.

Not Enough Variety - if you are canning your own foods to store then to remedy this problem next year plant some vegetables and fruits that you think would add some useful variety to your food stores. Also be sure to store flavorings, herbs, and spices in great variety as well. This will keep you from getting bored with foods should you have to live off of your food stores for an extended amount of time, it will also create a more nutrient rich diet as a variety in food typically translates as a variety in vitamins and minerals as well.

Extended Staples - This tip is for those of you that are storing food for long term needs. You will want to have foods that have been dehydrated or freeze dried in addition to home canned and purchased canned foods. Also be sure to have cooking basics on hand such as baking powder, cooking oil, shortening, soda, yeast, and if you do not have laying hens powdered eggs are good to have on hand as well.

Comfort Foods - These come in handy for any type of event that could have you stuck at home, jello, pudding, candy, etc. will help put people at ease. There is something soothing in knowing that you can have a treat even if roads are blocked due to severe snow storms.

Store Bulk Foods in Containers - This will help keep spoilage from moisture to a minimum and make the food harder for pests to get into. Be sure that your containers are food grade.

Leaving Rings on Cans - A lot of people don't realize that by leaving the canning rings on their canned goods they are risking not knowing if the can came unsealed and risk eating food that has went bad. Rings can also hold moisture and food residue which can lead to rust, mold, and it can attract rodents into your home. Before putting your canned goods into your pantry or food storage be sure to take the rings off and wipe off the jar with a damp cloth then dry thoroughly.

Products that can help you build your food storage:
Canning Supplies
Pressure Canner
Water Bath Canner
Food Dehydrator

What are your food storage tips?

Friday, July 20, 2012

Did you Know it is National Lollipop Day?

National Lollipop Day takes place on July 20th of each year. It is a celebration of the candy invention by George Smith in 1908. So to celebrate the Lollipop here is a recipe on how to make your own:

Make your Own Lollipops the Easy Way:

Ingredients & Supplies:
Assorted Hard Candies (flavors & colors of your choice)
Assorted Small Decorative Candies (optional)
Lollipop Sticks
Plastic Bag (strong one, a freezer bag should work)
Cookie Sheet and foil
Meat Mallet or Small Hammer
Optional: Metal Cookie Cutter

Directions:
Preheat your oven to 350 degrees. Take your foil, line the cookie sheet. Place your candy into the plastic freezer bag, and using the meat tenderizer, smash the candies into small pieces (you may want to do your colors or flavors separately so that you won't have to spend extra time picking the pieces apart to make your sucker). On the cookie sheet, stack your candies in piles that are 1/4 to 1/2 inch thick for each sucker, make only 3 to 4 suckers at a time. If you want to decorate your suckers place the assorted small decorative candies on them now. Place your suckers a minimum of 2 inches apart on the cookie sheet. Bake until the candies are completely melted, about 6-8 minutes. After removing from the oven, quickly (but carefully so you don't get burned) put the lollipop sticks into the suckers, giving them a little twist to be sure the candy is covering all sides of the end of the lollipop stick. Let your lollipops cool completely then peel from the foil.

If you want to make lollipops in certain shapes, place the candies inside the cookie cutter when melting.

LinkWithin

Related Posts Plugin for WordPress, Blogger...